5 Tips to Install Elbow Probes
When elbow probes do not screw into the connector properly during installation, it is usually more of an alignment issue than a thread issue.

Nothing can be more aggravating when installing elbows, than the probe not wanting to screw into the connector properly. When elbow probes do not screw into the connector properly during installation, it is usually more of an alignment issue than a thread issue.
1. Crimp connector according to crimp chart provided in elbow kit.Using the wrong die or crimping the connector too many times will cause the connector to bow and it will not line up with the hole for the probe once inside the elbow.
2. Check connector threads.A good habit for the lineman to get into is screwing the probe into the connector to check the threads before crimping the connector onto the cable. If there is a problem with the threads, you will want to know before you crimp the connector.
3. Ensure the connector is lined up perfectly inside the elbow.After the elbow is on the cable, ensure that the threads of the connector are lined up perfectly with the point inside the elbow, where the probe will be installed.
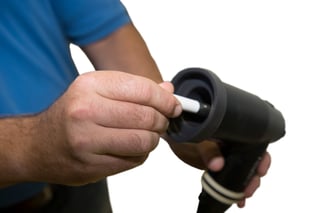 4. Start probe by hand first.
Remember the threads are copper. If you start the probe into the connector using an installation tool, you may be inclined to use too much force, damaging the threads.
5. Keep the white ablative material of the probe clean and free of contaminates during installation.

Recommended Posts
.png?width=767&name=ACL-HPSUA-GR-EN-04290%20(1).png)
How Utilities Use Capacitor Banks for Volt-VAR Optimization

Common Misconceptions About URD Grounding — and What You Should Know
